


说明
本笔记是是本人学习VUE视频教程时做的简单笔记,详情请观看视频【前端】Vue从入门到精通,31节精品课让你最快上手Vue,强力推荐!
1.前后端分离介绍
一种开发模式,前后端可以独立运行,前端独立运行主要基于node.js。但是一般部署的时候可以把前端项目打包后部署到Nginx,然后以docker容器运行。
2.VUE介绍
VUE是一个渐进式JavaScript框架,对于初学者来说,主要是怎么理解“渐进式”是什么意思,因为相比于传统的前端开发模式,我们主要是操作的是html页面,但是VUE把html页面的创建改成了多个component搭积木的方式,自底向上逐层应用,初学者理解起来还是有点困难。
3.SPA介绍
英文全称:Single Page web Application的简称 中文全称:单页Web应用程序
4.MVVM思路介绍
M:Model
V:View
VM:View-Model
5.VUE内容回顾
6.VUE名词解释
node.js
基于V8引擎的JavaScript运行库。通过它,JavaScript可以独立于浏览器运行,从而让WEB前端独立运行成为可能。
npm
node.js的包管理工具。
cnpm
npm的国内镜像版本。
webpack
类似于Java在的maven
Vue-cli
vue的客户端工具。通过vue-cli可以实现vue项目的脚手架功能。
7.VUE总体环境准备
1.环境搭建
安装node.js
mac下安装:
brew install node
安装cnpm
注意mac下如果提示没有目录操作权限,必须加上–aloow-root
sudo npm install -g cnpm --registry=https://registry.npm.taobao.org --allow-root

cnpm -v
我安装了yarn,发现intellij无法创建项目,有可能是因为没有设置代理,所以无法拉取依赖。设置一下yarn镜像代理:
yarn config set registry https://registry.npm.taobao.org/
删除yarn:
npm uninstall -g yarn
安装webpack
sudo cnpm install -g webpack webpack-cli
安装vue cli
sudo cnpm install -g @vue/cli
给intellij安装vue插件
我们使用的是intellij,需要安装vue插件,如果使用的是webstrom或vs code,也安装相应的插件即可。 在settings->plugins->搜索vue->vue.js点install->安装后重启intellij
8.VUE 第一个Vue.js项目
创建项目
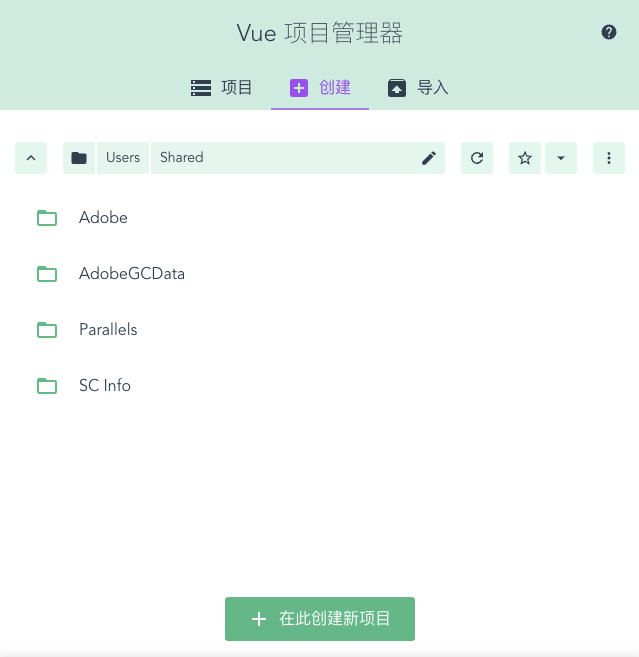
如果您使用的是intellij,可以通过intellij创建vue项目,如下图所示。

如果用的是vscode等IDE,则可以通过以下命令创建vue项目,然后打开即可。
vue init webpack demo
如果是VUE 3.x,也可以通过图形化界面创建项目。
vue ui
🚀  Starting GUI...
🌠  Ready on http://localhost:8001
通过http://localhost:8001创建项目
9.Vue目录结构介绍
10.VUE模板语法
-
通过{{}}显示数据
-
通过v-html显示数据
-
v-if指令
-
v-for指令
11.Vue的事件处理
- v-on:click=""处理点击事件
通过v-on:事件名=""给元素定义事件。
- @click=""处理点击事件
即v-on:的简写形式。
- 一个简单的事件实例:
<template>
  <div class="topbar">
    <div class="row">
      <img alt="苏州地图" src="../assets/10003.png">
      <button v-on:click="searchPOI">search</button>
      <button @click="searchPOI2">search2</button>
    </div>
  </div>
</template>

<script>
export default {
  name: 'TopBar',
  methods: {
    searchPOI: function () {
      alert("searchPOI");
    },
    searchPOI2() {
      alert("searchPOI2");
    },
  }
}
</script>

<style>
.topbar {
  width: 100vw;
  height: 97px;
  background: url("../assets/10001.png") repeat-x;
}
</style>
12.VUE组件介绍
了解VUE组件的构造,参数的定义等内容。
通过props定义参数,通过v-bind:属性值可以把参数赋值给属性。
<template>
  <div class="topbar">
    <img v-bind:alt="logoAlt" src="../assets/10003.png">
  </div>
</template>

<script>
export default {
  name: 'TopBar',
  //定义组件的参数
  props: {
    logoAlt: String,
    timeout: Number
  }
}
</script>

<style scoped>

</style>
组件的参数类型:
- String
- Number
- Boolean
- Array
- Object
- Function
- Promise
如果参数是String类型,可以通过 参数名=“参数值” 赋值,如果不是,则必须通过 v-bind:属性名=参数值 赋值。
13.VUE自定义组件
组件的定义,通过Intellij快速创建组件,然后在项目中引用。
路由介绍
在VUE里面,页面和组件其实是通用的,后缀也都是.vue,唯一不同的是组件一般用来定义重复使用的页面部件,而页面则是一次使用的。
要使用vue-router,得先进行安装。这里加入–save参数,将在package.json中加入该依赖,注意不要加-g,因为只是当前项目使用。
cnpm install --save vue-router
VUE路由案例1
首先要在main.js文件中导入vue-router和view页面,注意,我们这里使用的是vue3,所以大部分内容跟视频里面的已经不一样,以下文为准。
- 新建router/index.js,定义router
/** Vue Router4.x版本 */
import {createRouter, createWebHistory} from 'vue-router'
import SearchPOI from "@/views/SearchPOI";
import SearchAround from '@/views/SearchAround'

const routes = [
    {
        path: '/searchPOI',
        component: SearchPOI
    },
    {
        path: '/searchAround',
        component: SearchAround,
    }
]

const router = new createRouter({
    history: createWebHistory(), // history为必填项
    routes,
})

export {
    router
}
- 修改main.js,加载router
import {createApp} from 'vue'
import App from './App.vue'

//createApp(App).mount('#app')

import {router} from '@/router/index'

const app = createApp(App);
app.use(router) //使用router
app.mount('#app')
- 在App.vue中使用路由视图
<template>
  <TopBar logoAlt="智慧苏州"/>
  <!--使用路由-->
  <router-view></router-view>
  <MainContent/>
</template>

<script>
import TopBar from "./components/TopBar.vue"
import MainContent from "@/components/MainContent";

export default {
  name: 'App',
  components: {
    TopBar,
    MainContent
  }
}
</script>

<style>
#app {
  font-family: Avenir, Helvetica, Arial, sans-serif;
  -webkit-font-smoothing: antialiased;
  -moz-osx-font-smoothing: grayscale;
  color: #2c3e50;
  margin: 0;
  padding: 0;
}
</style>
在地址栏输入http://localhost:8080/searchPOI或http://localhost:8080/searchAround就可以显示不同内容了。
17.VUE路由案例2
上一章是通过手动在地址栏输入地址进行路由访问的,这一章我们通过按钮来访问。很简单,我们只要给按钮添加事件响应即可。
<template>
  <div class="topbar">
    <div class="row">
      <img v-bind:alt="logoAlt" src="../assets/10003.png">
      <button @click="goSearchPOI">地图搜索</button>
      <button @click="goSearchAround">周边查询</button>
    </div>
  </div>
</template>

<script>
export default {
  name: 'TopBar',
  //定义组件的参数
  props: {
    logoAlt: String
  },
  methods: {
    goSearchPOI: function () {
      this.$router.push("/searchPOI") //路由访问
    },
    goSearchAround() {
      this.$router.push("/searchAround"); //路由访问
    }
  }
}
</script>

<style scoped>
.topbar {
  width: 100vw;
  height: 97px;
  background: url("../assets/10001.png") repeat-x;
}
</style>
18.VUE_优化路由编码结构
把router相关代码写到单独的js文件中,然后再在App.vue中引用,代码跟清晰,更便于后期维护。
/**
 * Vue Router4.x版本
 * 文件名为index.js的好处是引用时只要写到上级目录即可,VUE会自动找index.js文件。
 * */
import {createRouter, createWebHistory} from 'vue-router'
import SearchPOI from "@/views/SearchPOI";
import SearchAround from '@/views/SearchAround'

const routes = [
    {
        path: '/searchPOI',
        component: SearchPOI
    },
    {
        path: '/searchAround',
        component: SearchAround,
    }
]

const router = new createRouter({
    history: createWebHistory(), // history为必填项
    routes,
})

export {
    router
}
19.VUE_ElementUI演示
首先安装ElementUI依赖:
本文参考的视频链接是基于VUE2.X的,而现在通过Intellij安装的vue插件默认使用的是vue3,所以安装element-ui的过程会跟视频里面的不一样。element-ui针对VUE3.0的版本应该是element-plus。
sudo cnpm install element-plus --save
安装好之后,在main.js文件中配置elementPlus即可。
import {createApp} from 'vue'
import App from './App.vue'

//引入element-ui
import elementPlus from 'element-plus'
import 'element-plus/dist/index.css'

import {router} from '@/router'

createApp(App).use(elementPlus).use(router).mount('#app')
然后在组件中使用element-plus的组件即可。例如以下为一个按钮。
<el-button type=“primary” @click=“goSearchPOI”>地图搜索
20.VUE_课堂练习
用VUE实现登录-菜单显示-数据显示的简单demo。
目的
- 如何在前后端分离下独立开发服务器端项目
- 如何编写接口文档
- 熟练使用element-plus
评论区