


Longhorn介绍
Longhorn是一个开源的轻量级、强大而又可扩展的k8s持久化存储方案,安装非常简单,并提供了可视化监控界面,非常好用。在我的这篇博文里面已经介绍了如何在k3os中挂载磁盘,下面我们将讨论如何通过Longhorn把集群中的存贮进行整合和利用。
安装前提
- Docker v1.13+
- Kubernetes v1.14+.
- open-iscsi has been installed on all the nodes of the Kubernetes cluster, and iscsid daemon is running on all the nodes.【每个node都必须有open-iscsi】
- For GKE, recommended Ubuntu as guest OS image since it contains open-iscsi already.
- For Debian/Ubuntu, use apt-get install open-iscsi to install.
- For RHEL/CentOS, use yum install iscsi-initiator-utils to install.【CentOS通过命令yum install iscsi-initiator-utils安装】
- For EKS with EKS Kubernetes Worker AMI with AmazonLinux2 image, use yum install iscsi-initiator-utils to install. You may need to edit cluster security group to allow ssh access.
- A host filesystem supports file extents feature on the nodes to store the data. Currently we support:
- ext4
- XFS
可以在Master中运行一下这个脚本,检查一下我们的环境是否满足安装Longhorn的需求。
#!/bin/bash

dependencies() {
  local targets=($@)
  local allFound=true
  for ((i=0; i<${#targets[@]}; i++)); do
    local target=${targets[$i]}
    if [ "$(which $target)" == "" ]; then
      allFound=false
      echo Not found: $target
    fi
  done
  if [ "$allFound" == "false" ]; then
    echo "Please install missing dependencies."
    exit 2
  fi
}

create_ds() {
cat <<EOF > $TEMP_DIR/environment_check.yaml
apiVersion: apps/v1
kind: DaemonSet
metadata:
  labels:
    app: longhorn-environment-check
  name: longhorn-environment-check
spec:
  selector:
    matchLabels:
      app: longhorn-environment-check
  template:
    metadata:
      labels:
        app: longhorn-environment-check
    spec:
      containers:
      - name: longhorn-environment-check
        image: busybox
        args: ["/bin/sh", "-c", "sleep 1000000000"]
        volumeMounts:
        - name: mountpoint
          mountPath: /tmp/longhorn-environment-check
          mountPropagation: Bidirectional
        securityContext:
          privileged: true
      volumes:
      - name: mountpoint
        hostPath:
            path: /tmp/longhorn-environment-check
EOF
  kubectl create -f $TEMP_DIR/environment_check.yaml
}

cleanup() {
  echo "cleaning up..."
  kubectl delete -f $TEMP_DIR/environment_check.yaml
  rm -rf $TEMP_DIR
  echo "clean up complete"
}

wait_ds_ready() {
  while true; do
    local ds=$(kubectl get ds/longhorn-environment-check -o json)
    local numberReady=$(echo $ds | jq .status.numberReady)
    local desiredNumberScheduled=$(echo $ds | jq .status.desiredNumberScheduled)

    if [ "$desiredNumberScheduled" == "$numberReady" ] && [ "$desiredNumberScheduled" != "0" ]; then
      echo "all pods ready ($numberReady/$desiredNumberScheduled)"
      return
    fi

    echo "waiting for pods to become ready ($numberReady/$desiredNumberScheduled)"
    sleep 3
  done
}

validate_ds() {
  local allSupported=true
  local pods=$(kubectl -l app=longhorn-environment-check get po -o json)

  for ((i=0; i<1; i++)); do
    local pod=$(echo $pods | jq .items[$i])
    local nodeName=$(echo $pod | jq -r .spec.nodeName)
    local mountPropagation=$(echo $pod | jq -r '.spec.containers[0].volumeMounts[] | select(.name=="mountpoint") | .mountPropagation')

    if [ "$mountPropagation" != "Bidirectional" ]; then
      allSupported=false
      echo "node $nodeName: MountPropagation DISABLED"
    fi
  done

  if [ "$allSupported" != "true" ]; then
    echo
    echo "  MountPropagation is disabled on at least one node."
    echo "  As a result, CSI driver and Base image cannot be supported."
    echo
    exit 1
  else
    echo -e "\n  MountPropagation is enabled!\n"
  fi
}

dependencies kubectl jq mktemp
TEMP_DIR=$(mktemp -d)
trap cleanup EXIT
create_ds
wait_ds_ready
validate_ds
exit 0
检查结果如下:
k3os-master1 [~]$ ./check-env.sh
daemonset.apps/longhorn-environment-check created
waiting for pods to become ready (0/4)
waiting for pods to become ready (0/4)
waiting for pods to become ready (1/4)
waiting for pods to become ready (1/4)
waiting for pods to become ready (1/4)
waiting for pods to become ready (1/4)
waiting for pods to become ready (3/4)
all pods ready (4/4)

  MountPropagation is enabled!

cleaning up...
daemonset.apps "longhorn-environment-check" deleted
clean up complete
安装Longhorn
通过Kubectl安装。
只需要通过以下命令安装即可:
kubectl apply -f https://raw.githubusercontent.com/longhorn/longhorn/master/deploy/longhorn.yaml
安装过程中,可以通过以下命令查看安装进度:
kubectl get pods \
--namespace longhorn-system \
--watch
如果所有的pod状态都为running,那么就可以了。
# kubectl get pod -n longhorn-system
NAME                                        READY   STATUS    RESTARTS   AGE
csi-attacher-5b4745c5f7-7d6x5               1/1     Running   0          8d
csi-attacher-5b4745c5f7-fz7kf               1/1     Running   0          8d
csi-attacher-5b4745c5f7-q25lw               1/1     Running   0          8d
csi-provisioner-57d6dbf5f4-6qrfp            1/1     Running   0          8d
csi-provisioner-57d6dbf5f4-mtggd            1/1     Running   0          8d
csi-provisioner-57d6dbf5f4-zwxp2            1/1     Running   0          8d
csi-resizer-75ff56bc48-fsxbl                1/1     Running   0          8d
csi-resizer-75ff56bc48-k2tgg                1/1     Running   0          8d
csi-resizer-75ff56bc48-xtclt                1/1     Running   0          8d
engine-image-ei-ee18f965-mbhwk              1/1     Running   0          8d
engine-image-ei-ee18f965-ph8nv              1/1     Running   0          8d
engine-image-ei-ee18f965-rtgb9              1/1     Running   0          8d
instance-manager-e-80f80a2e                 1/1     Running   0          8d
instance-manager-e-bdf1fa83                 1/1     Running   0          8d
instance-manager-e-f784bbd1                 1/1     Running   0          8d
instance-manager-r-3d95a536                 1/1     Running   0          8d
instance-manager-r-8d2de566                 1/1     Running   0          8d
instance-manager-r-e282f7dc                 1/1     Running   0          8d
longhorn-csi-plugin-cnrwg                   2/2     Running   0          8d
longhorn-csi-plugin-zsgdg                   2/2     Running   0          8d
longhorn-csi-plugin-zt67q                   2/2     Running   1          8d
longhorn-driver-deployer-8558cf45fb-5tvxw   1/1     Running   0          8d
longhorn-manager-7tf5m                      1/1     Running   7          8d
longhorn-manager-s22x6                      1/1     Running   7          8d
longhorn-manager-tpnbr                      1/1     Running   7          8d
longhorn-ui-65d76ddf9b-wfst7                1/1     Running   0          8d
安装GUI工具
- 首选生成密钥文件
USER=<USERNAME_HERE>; PASSWORD=<PASSWORD_HERE>; echo "${USER}:$(openssl passwd -stdin -apr1 <<< ${PASSWORD})" >> auth
您会发现在新版的k3os中没有安装openssl(提示openssl: command not found),所以你需要在你自己的电脑上执行该命令,而不应该到master主机中去执行。
- 接着创建一个secret
kubectl -n longhorn-system create secret generic basic-auth --from-file=auth
- 创建一个longhorn-ingress.yml文件,输入如下内容:
apiVersion: networking.k8s.io/v1beta1
kind: Ingress
metadata:
  name: longhorn-ingress
  namespace: longhorn-system
  annotations:
    # type of authentication
    nginx.ingress.kubernetes.io/auth-type: basic
    # prevent the controller from redirecting (308) to HTTPS
    nginx.ingress.kubernetes.io/ssl-redirect: 'false'
    # name of the secret that contains the user/password definitions
    nginx.ingress.kubernetes.io/auth-secret: basic-auth
    # message to display with an appropriate context why the authentication is required
    nginx.ingress.kubernetes.io/auth-realm: 'Authentication Required '
spec:
  rules:
  - host: longhorn.fitit100.cn #域名方式访问,需要自己修改hosts
    http:
      paths:
        - backend:
            serviceName: longhorn-frontend
            servicePort: 80
          path: /
  - http:
      paths:
      - path: /
        backend:
          serviceName: longhorn-frontend
          servicePort: 80
- 创建Ingress
kubectl -n longhorn-system apply -f longhorn-ingress.yml
查看创建结果:
kevinmeng@MacBook-Pro ~ % kubectl -n longhorn-system get ingress
NAME               CLASS    HOSTS   ADDRESS        PORTS   AGE
longhorn-ingress   <none>   *       192.168.2.51   80      14m
现在通过https://192.168.2.51就可以访问Longhorn的Dashboard了。
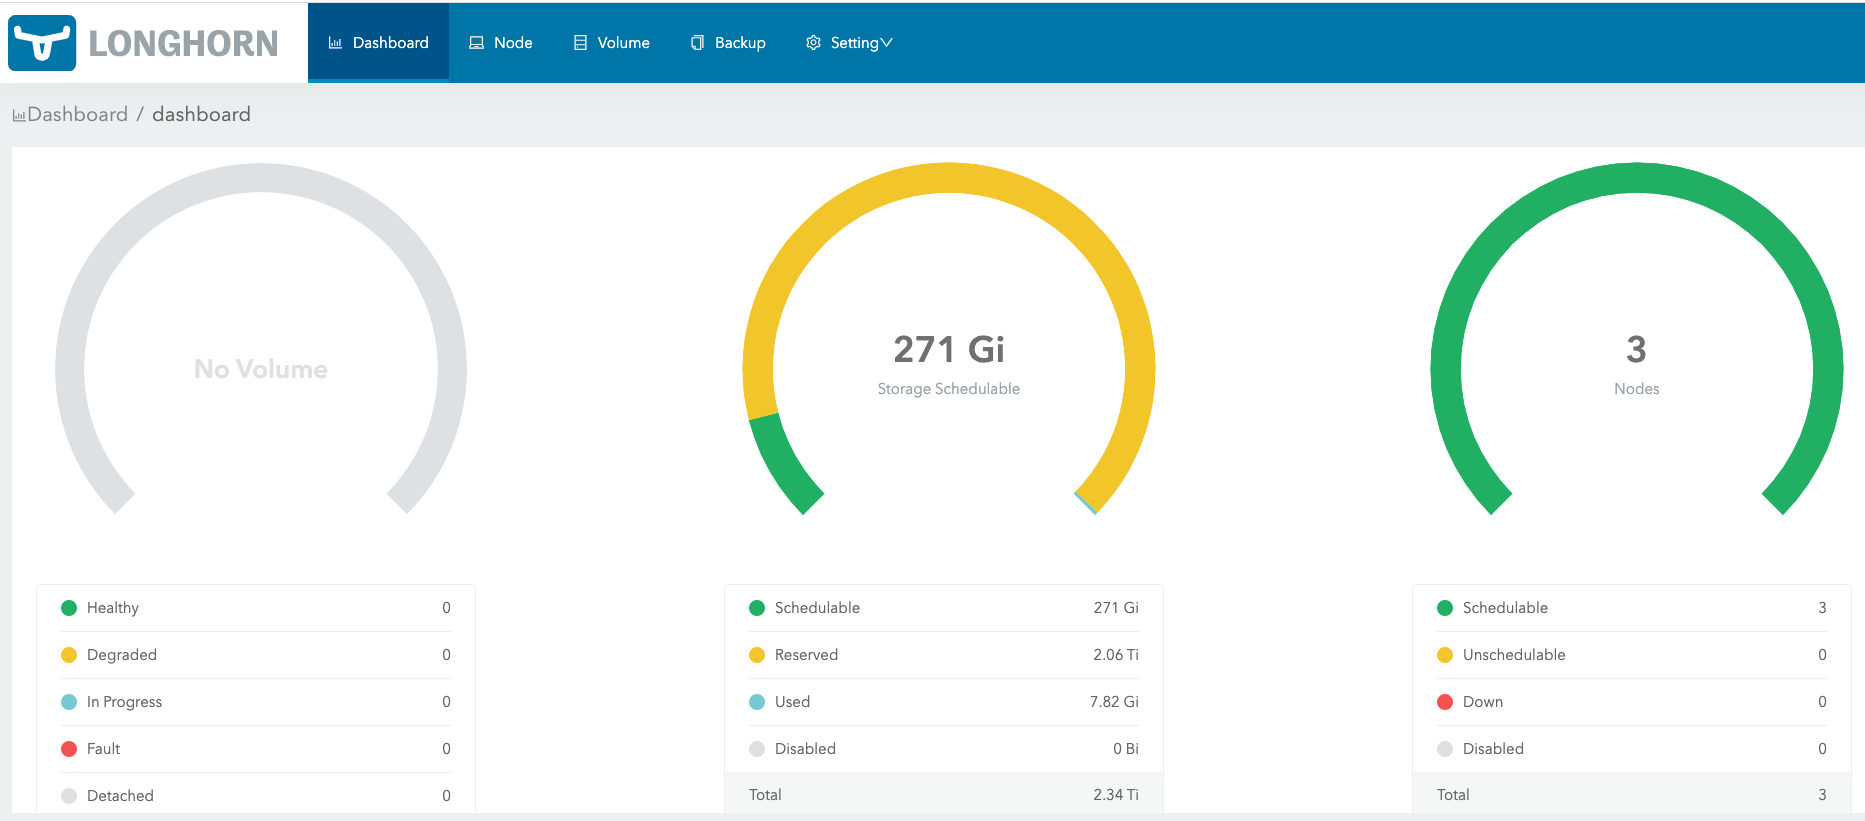
由于longhorn的设计理念就是数据存贮的高可靠性,所以每份数据至少有3个以上的副本,而且必须是奇数份(3,5,7…),所以我们集群的存贮节点必须是>=3的奇数,这点要注意,否则您会发现你建的vloume会没法调度,因为它不满足调度的基本要求。
评论区