


本文主要基于youtube上的这个视频 ,并做了简单优化,需要原视频的,可以跟我联系。完整的源代码我也放到了git仓库中,需要的自行下载。网上很多springboot整合JWT用户认证和授权的教程,但是不是springboot版本太低,就是代码不完整,而且很多都是通过编写自定义的filter或拦截器进行jwt拦截和解析,本文直接使用oauth2-resource-server类库,因而代码更简洁,今后升级也更简单,只要把springboot升级上去即可。
开发环境
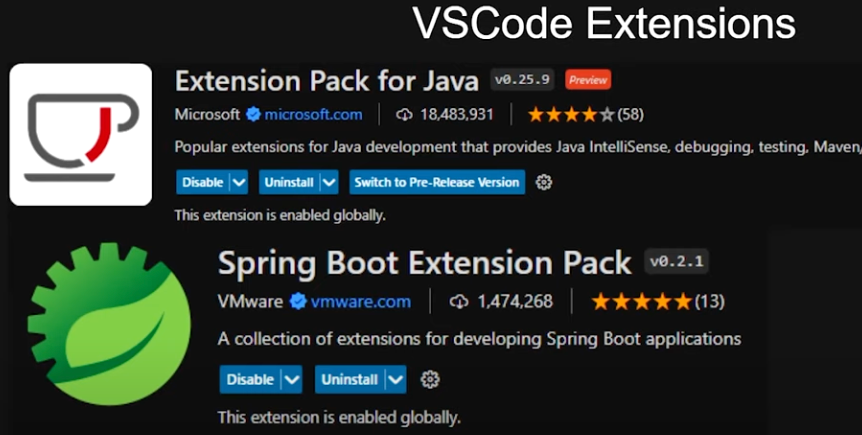
原视频中是基于vscode进行开发的,需要安装以下两个插件,请自行安装。如果你是用intellij开发,可能跳过这个步骤。
总体框架
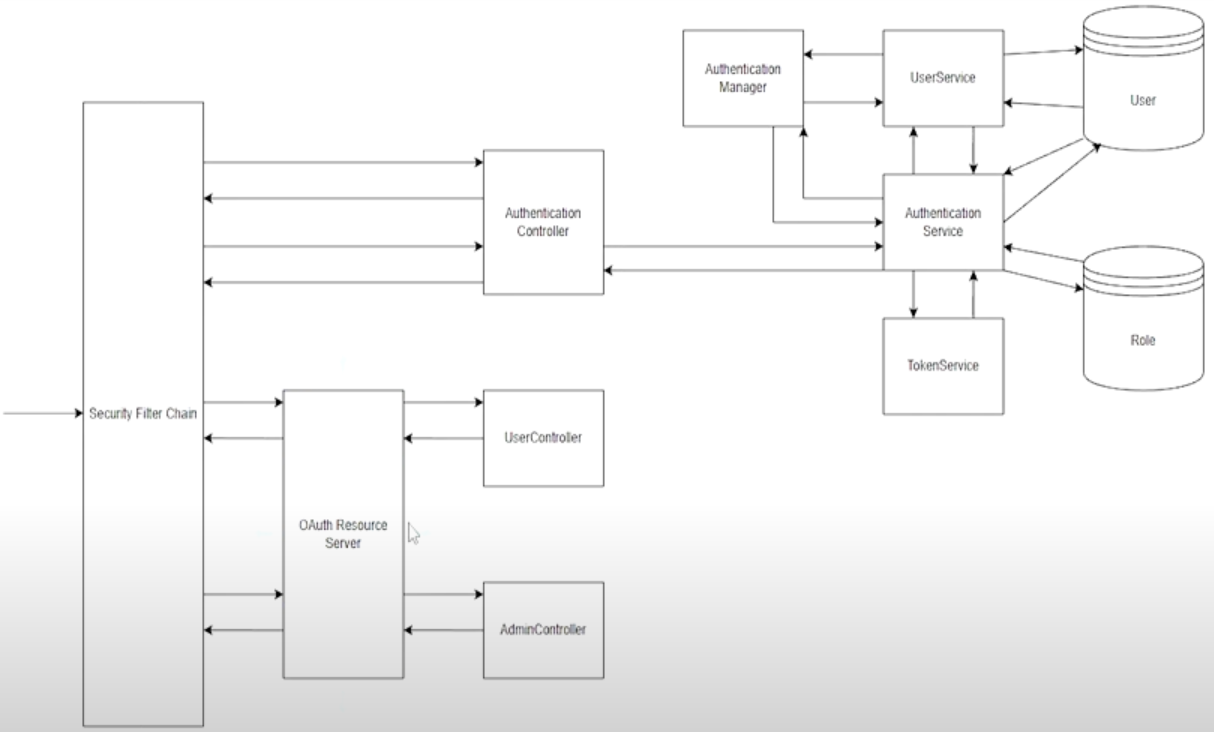
项目的总体框架如下,其中AuthenticationController是认证授权相关的,UserController和AdminController是两个简单的调用示例。
创建项目
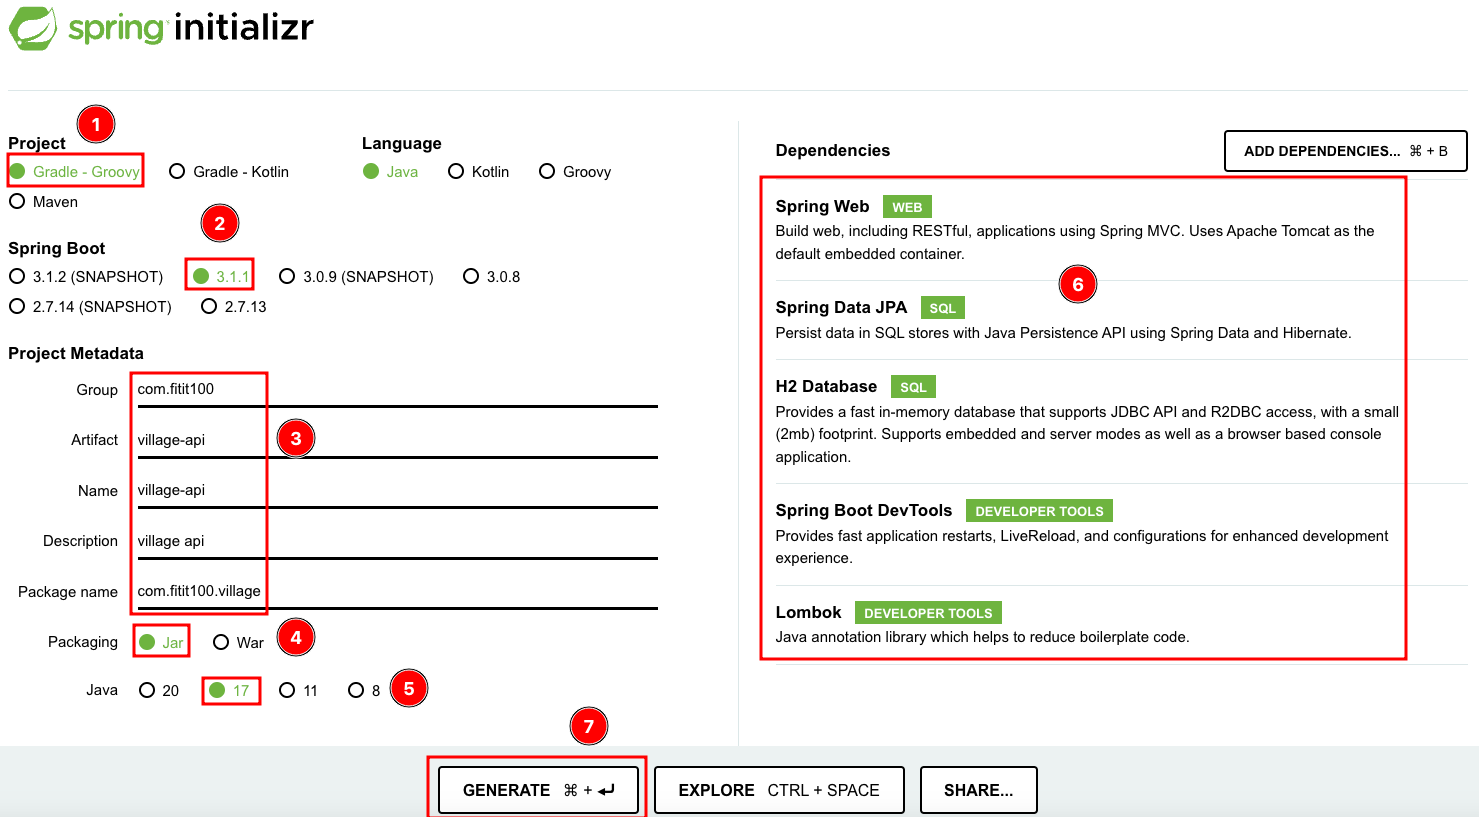
这里我们可以通过start.spring.io创建项目。原视频中用的是maven项目,我这里用的是gradle项目,springboot也使用了最新的稳定版本3.1.1,其他基本一致。
创建好项目之后,我们把下载的zip压缩包解压,把所有文件复制到我们的vscode项目目录下。vscode打开目录后,点击JAVA PROJECTS栏,VSCode会自动识别项目并帮我们编译。如下图。
编译好之后,点击spring boot dashboard,在app一栏点debug即可启动项目。
上面是基于VSCode的开发环境配置,我个人还是比较喜欢用intellij进行开发(intellij的自动补全功能太好用了,特别是springboot,呵呵)。要用intellij进行开发,只要用intellij打开我们的这个项目即可。
配置数据库连接
打开我们的项目,把application.properties文件重命名为application.yml文件(我个人比较喜欢用yaml文件,因为yaml文件对中文的支持更好一些)。然后复制一份为application-dev.yml,打开application.yml文件,加入如下配置:
server:
  port: 8104
spring:
  profiles:
    active: dev
然后打开application-dev.yml文件配置数据库连接,开发环境下,我们用的是H2数据库,生产环境下会切换到postgres数据库。
spring:
  datasource:
    url: jdbc:h2:file:~/village-data-dev;MODE=PostgreSQL;DATABASE_TO_LOWER=TRUE
    driver-class-name: org.h2.Driver
    username: sa
    password: password
  jpa:
    database-platform: org.hibernate.dialect.H2Dialect
    show-sql: true
    hibernate:
      ddl-auto: create-drop
此时启动项目,会出现找不到数据库目录的错误。创建一下"~/village-data-dev"目录然后重启项目即可(window下自行设置数据库目录)。
新建测试用的Controller
新建两个测试用的Controller,代码如下:
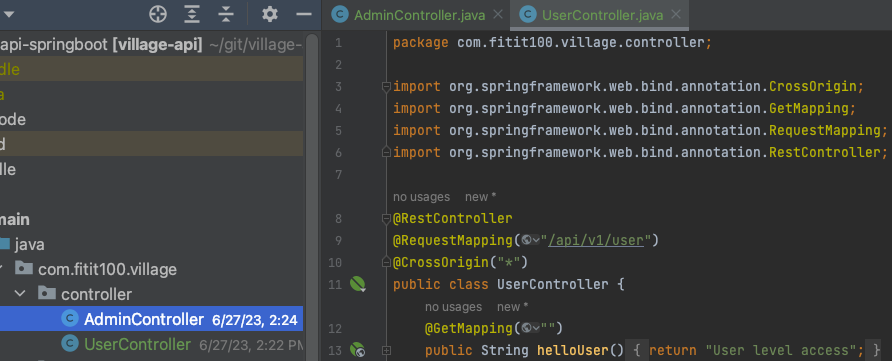
UserController代码:
package com.fitit100.village.controller;

import org.springframework.web.bind.annotation.CrossOrigin;
import org.springframework.web.bind.annotation.GetMapping;
import org.springframework.web.bind.annotation.RequestMapping;
import org.springframework.web.bind.annotation.RestController;

@RestController
@RequestMapping("/api/v1/user")
@CrossOrigin("*")
public class UserController {
    @GetMapping("")
    public String helloUser() {
        return "User level access";
    }
}
AdminController代码:
package com.fitit100.village.controller;


import org.springframework.web.bind.annotation.CrossOrigin;
import org.springframework.web.bind.annotation.GetMapping;
import org.springframework.web.bind.annotation.RequestMapping;
import org.springframework.web.bind.annotation.RestController;

@RestController
@RequestMapping("/api/v1/admin")
@CrossOrigin("*")
public class AdminController {
    @GetMapping("")
    public String helloAdmin() {
        return "Admin level access";
    }
}
重启项目,分别访问http://localhost:8104/api/v1/user和http://localhost:8104/api/v1/admin就可以看到返回的结果了。
整合spring security
再次打开start.spring.io,按下图步骤加入spring security依赖。

加完security依赖后,重启项目,这时候访问前面的两个Controller,会要求输入用户名和密码,用户名为user,密码为控制台中打印出来的随机密码。这样spring security就整合进来了。
新建一个SecurityConfiguration类,加入如下配置:
package com.fitit100.village.config;

import org.springframework.context.annotation.Bean;
import org.springframework.context.annotation.Configuration;
import org.springframework.security.config.annotation.web.builders.HttpSecurity;
import org.springframework.security.web.SecurityFilterChain;

@Configuration
public class SecurityConfiguration {
    @Bean
    public SecurityFilterChain filterChain(HttpSecurity http) throws Exception {
        return http.csrf(crsf -> crsf.disable())
                .authorizeHttpRequests(auth -> auth.anyRequest().permitAll())
                .build();
    }
}重启项目,这时候我们又可以直接访问http://localhost:8104/api/v1/user和http://localhost:8104/api/v1/admin了,因为这里我们设置所有请求都不需要认证。
建立数据库模型
既然是用户认证和授权,当然少不了用户和角色,下面开始建立数据库模型。
AppUser.java
package com.fitit100.village.models;

import jakarta.persistence.*;
import lombok.Data;
import org.springframework.security.core.GrantedAuthority;
import org.springframework.security.core.userdetails.UserDetails;

import java.util.Collection;
import java.util.HashSet;
import java.util.Set;

@Entity
@Table(name = "v_user")
@Data
public class AppUser implements UserDetails {
    @Id
    @GeneratedValue(strategy = GenerationType.AUTO)
    @Column(name = "user_id")
    private Integer userId;
    @Column(unique = true)
    private String username;
    private String password;

    @ManyToMany(fetch = FetchType.EAGER)
    @JoinTable(
            name = "user_role_junction",
            joinColumns = {@JoinColumn(name = "user_id")},
            inverseJoinColumns = {@JoinColumn(name = "role_id")}
    )
    private Set<Role> authorities;

    public AppUser() {
        super();
        this.authorities = new HashSet<Role>();
    }

    @Override
    public Collection<? extends GrantedAuthority> getAuthorities() {
        return this.authorities;
    }

    @Override
    public boolean isAccountNonExpired() {
        return true;
    }

    @Override
    public boolean isAccountNonLocked() {
        return true;
    }

    @Override
    public boolean isCredentialsNonExpired() {
        return true;
    }

    @Override
    public boolean isEnabled() {
        return true;
    }
}
Role.java
package com.fitit100.village.models;

import jakarta.persistence.*;
import lombok.Data;
import org.springframework.security.core.GrantedAuthority;

@Entity
@Table(name="v_role")
@Data
public class Role implements GrantedAuthority {
    @Id
    @GeneratedValue(strategy = GenerationType.AUTO)
    @Column(name = "role_id")
    private Integer roleId;
    @Column(unique = true)
    private String authority;
}
重启项目,将会自动创建v_user和v_role两个表。
自定义UserDetailsService
接下来我们要自定义UserDetailsService,实现从数据库里面读取用户信息进行用户认证。
新增一个类UserService.java,代码如下:
package com.fitit100.village.services;

import com.fitit100.village.models.AppUser;
import com.fitit100.village.models.Role;
import org.springframework.beans.factory.annotation.Autowired;
import org.springframework.security.core.userdetails.UserDetails;
import org.springframework.security.core.userdetails.UserDetailsService;
import org.springframework.security.core.userdetails.UsernameNotFoundException;
import org.springframework.security.crypto.password.PasswordEncoder;
import org.springframework.stereotype.Service;

import java.util.HashSet;
import java.util.Set;

@Service
public class UserService implements UserDetailsService {

    @Autowired
    private PasswordEncoder encoder;

    @Override
    public UserDetails loadUserByUsername(String username) throws UsernameNotFoundException {
        if (!username.equals("mlk")) {
            throw new UsernameNotFoundException("not mlk");
        }
        Set<Role> roles = new HashSet<>();
        roles.add(new Role(1, "USER"));

        return new AppUser(1, "mlk", encoder.encode("mlk"), roles);
    }
}
这里我们先创建了一个测试用的用户test,后面我们会改成从数据库里面读取用户。
修改SecurityConfiguration.java文件,内容如下:
package com.fitit100.village.config;

import org.springframework.context.annotation.Bean;
import org.springframework.context.annotation.Configuration;
import org.springframework.security.authentication.AuthenticationManager;
import org.springframework.security.authentication.ProviderManager;
import org.springframework.security.authentication.dao.DaoAuthenticationProvider;
import org.springframework.security.config.annotation.web.builders.HttpSecurity;
import org.springframework.security.core.userdetails.UserDetailsService;
import org.springframework.security.crypto.bcrypt.BCryptPasswordEncoder;
import org.springframework.security.crypto.password.PasswordEncoder;
import org.springframework.security.web.SecurityFilterChain;

@Configuration
public class SecurityConfiguration {
    //新增
    @Bean
    public PasswordEncoder passwordEncoder() {
        return new BCryptPasswordEncoder();
    }

    //新增
    @Bean
    public AuthenticationManager authenticationManager(UserDetailsService detailsService) {
        DaoAuthenticationProvider daoAuthenticationProvider = new DaoAuthenticationProvider();
        daoAuthenticationProvider.setUserDetailsService(detailsService);
        return new ProviderManager(daoAuthenticationProvider);
    }

    //修改配置
    @Bean
    public SecurityFilterChain filterChain(HttpSecurity http) throws Exception {
        http.csrf(crsf -> crsf.disable())
                .authorizeHttpRequests(auth -> auth.anyRequest().authenticated());

        http.httpBasic();

        return http.build();
    }
}
重启项目,这时候我们就可以用test用户来访问我们的两个接口了。
实现从数据库中读取用户
OK,现在开始从数据库中读取用户信息。
新建UserRepository.java,代码如下:
package com.fitit100.village.repository;

import com.fitit100.village.models.AppUser;
import org.springframework.data.jpa.repository.JpaRepository;
import org.springframework.stereotype.Repository;

import java.util.Optional;

@Repository
public interface UserRepository extends JpaRepository<AppUser, Integer> {
    Optional<AppUser> findByUsername(String username);
}
新建RoleRepository.java,代码如下:
package com.fitit100.village.repository;

import com.fitit100.village.models.Role;
import org.springframework.data.jpa.repository.JpaRepository;
import org.springframework.stereotype.Repository;

import java.util.Optional;

@Repository
public interface RoleRepository extends JpaRepository<Role, Integer> {
    Optional<Role> findByAuthority(String authority);
}
修改VillageApiApplication.java,加入初始化用户的代码,这里添加了一个admin用户,密码为admin,角色为USER。
package com.fitit100.village;

import com.fitit100.village.models.AppUser;
import com.fitit100.village.models.Role;
import com.fitit100.village.repository.RoleRepository;
import com.fitit100.village.repository.UserRepository;
import org.springframework.boot.CommandLineRunner;
import org.springframework.boot.SpringApplication;
import org.springframework.boot.autoconfigure.SpringBootApplication;
import org.springframework.context.annotation.Bean;
import org.springframework.security.crypto.password.PasswordEncoder;

import java.util.HashSet;
import java.util.Set;

@SpringBootApplication
public class VillageApiApplication {

    public static void main(String[] args) {
        SpringApplication.run(VillageApiApplication.class, args);
    }
    //加入初始化用户的代码
    @Bean
    CommandLineRunner runner(
            RoleRepository roleRepository,
            UserRepository userRepository,
            PasswordEncoder passwordEncoder
    ) {
        return args -> {
            if (roleRepository.findByAuthority("ADMIN").isPresent()) return;
            Role adminRole = roleRepository.save(
                    new Role("ADMIN")
            );
            roleRepository.save(new Role("USER"));
            Set<Role> roles = new HashSet<>();
            roles.add(adminRole);
            AppUser admin = new AppUser(1, "admin", passwordEncoder.encode("admin"), roles);
            userRepository.save(admin);
        };
    }
}
修改UserService类,从数据库中读取用户信息。
package com.fitit100.village.services;

import com.fitit100.village.models.AppUser;
import com.fitit100.village.models.Role;
import com.fitit100.village.repository.UserRepository;
import org.springframework.beans.factory.annotation.Autowired;
import org.springframework.security.core.userdetails.UserDetails;
import org.springframework.security.core.userdetails.UserDetailsService;
import org.springframework.security.core.userdetails.UsernameNotFoundException;
import org.springframework.security.crypto.password.PasswordEncoder;
import org.springframework.stereotype.Service;

import java.util.HashSet;
import java.util.Set;

@Service
public class UserService implements UserDetailsService {

    @Autowired
    private PasswordEncoder encoder;

    @Autowired
    private UserRepository userRepository;

    @Override
    public UserDetails loadUserByUsername(String username) throws UsernameNotFoundException {
        /*if (!username.equals("mlk")) {
            throw new UsernameNotFoundException("not mlk");
        }
        Set<Role> roles = new HashSet<>();
        roles.add(new Role(1, "USER"));

        return new AppUser(1, "mlk", encoder.encode("mlk"), roles);*/
        //改成从数据库中读取用户信息
        return userRepository.findByUsername(username).orElseThrow(() -> new UsernameNotFoundException("用户不存在!"));
    }
}
这时候重启项目,就可以通过用户admin登录了。
实现用户注册功能
上文中,我们的用户是在程序启动时通过初始化代码添加的,现在我们要添加用户注册功能,实现通过接口注册新用户。
添加一个AuthenticationService.java类,该类实现了用户注册逻辑,代码如下:
package com.fitit100.village.services;


import com.fitit100.village.models.AppUser;
import com.fitit100.village.models.Role;
import com.fitit100.village.repository.RoleRepository;
import com.fitit100.village.repository.UserRepository;
import org.springframework.beans.factory.annotation.Autowired;
import org.springframework.security.crypto.password.PasswordEncoder;
import org.springframework.stereotype.Service;
import org.springframework.transaction.annotation.Transactional;

import java.util.HashSet;
import java.util.Set;

@Service
@Transactional //启用事务
public class AuthenticationService {
    @Autowired
    private UserRepository userRepository;

    @Autowired
    private RoleRepository roleRepository;

    @Autowired
    private PasswordEncoder passwordEncoder;

    public AppUser registerUser(String username, String password) {
        String encodePassword = passwordEncoder.encode(password);
        Role userRole = roleRepository.findByAuthority("USER").get();
        Set<Role> roleSet = new HashSet<>();
        roleSet.add(userRole);

        AppUser user = new AppUser();
        user.setUsername(username);
        user.setPassword(encodePassword);
        user.setAuthorities(roleSet);
        return userRepository.save(user);
    }
}
新加一个RegistrationDTO.java类,代码如下:
package com.fitit100.village.models;

import lombok.Data;

@Data
public class RegistrationDTO {
    private String username;
    private String password;
}
新加一个AuthenticationController.java,代码如下:
package com.fitit100.village.controller;

import com.fitit100.village.models.AppUser;
import com.fitit100.village.models.RegistrationDTO;
import com.fitit100.village.services.AuthenticationService;
import org.springframework.beans.factory.annotation.Autowired;
import org.springframework.web.bind.annotation.*;

@RestController
@RequestMapping("/api/v1/auth")
@CrossOrigin("*")
public class AuthenticationController {
    @Autowired
    private AuthenticationService authenticationService;

    @PostMapping("/register")
    public AppUser registerUser(@RequestBody RegistrationDTO body){
        return authenticationService.registerUser(body.getUsername(), body.getPassword());
    }
}
重启项目,用postman测试一下我们的用户注册接口,如下图:
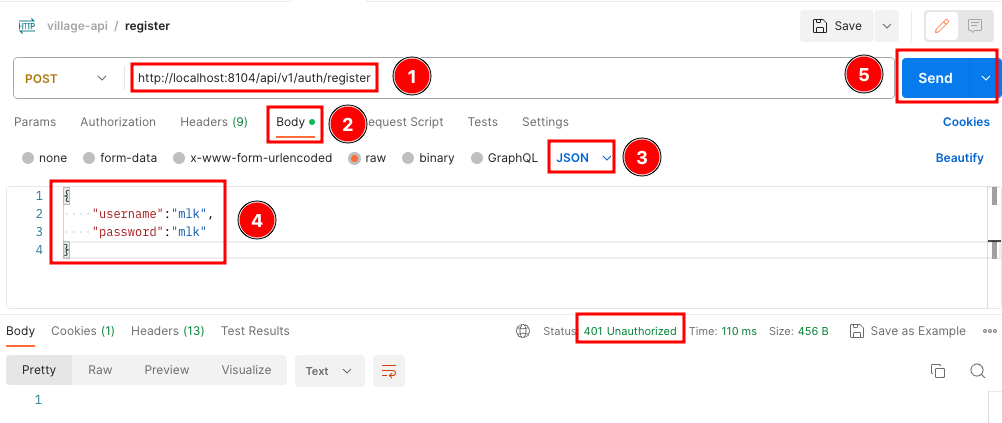
这时候会提示没有认证,不用紧张,修改一下SecurityConfiguration.java中的代码即可,修改后的代码如下:
package com.fitit100.village.config;
import org.springframework.context.annotation.Bean;
import org.springframework.context.annotation.Configuration;
import org.springframework.security.authentication.AuthenticationManager;
import org.springframework.security.authentication.ProviderManager;
import org.springframework.security.authentication.dao.DaoAuthenticationProvider;
import org.springframework.security.config.Customizer;
import org.springframework.security.config.annotation.web.builders.HttpSecurity;
import org.springframework.security.core.userdetails.UserDetailsService;
import org.springframework.security.crypto.bcrypt.BCryptPasswordEncoder;
import org.springframework.security.crypto.password.PasswordEncoder;
import org.springframework.security.web.SecurityFilterChain;
@Configuration
public class SecurityConfiguration {
@Bean
public PasswordEncoder passwordEncoder() {
return new BCryptPasswordEncoder();
}
@Bean
public AuthenticationManager authenticationManager(UserDetailsService detailsService) {
DaoAuthenticationProvider daoAuthenticationProvider = new DaoAuthenticationProvider();
daoAuthenticationProvider.setUserDetailsService(detailsService);
return new ProviderManager(daoAuthenticationProvider);
}
@Bean
public SecurityFilterChain filterChain(HttpSecurity http) throws Exception {
http.csrf(crsf -> crsf.disable())
.authorizeHttpRequests(auth -> {
auth.requestMatchers("/api/v1/auth/**").permitAll(); //修改这里,放开/api/v1/auth/**的访问限制
auth.anyRequest().authenticated();
});
http.httpBasic(Customizer.withDefaults());
return http.build();
}
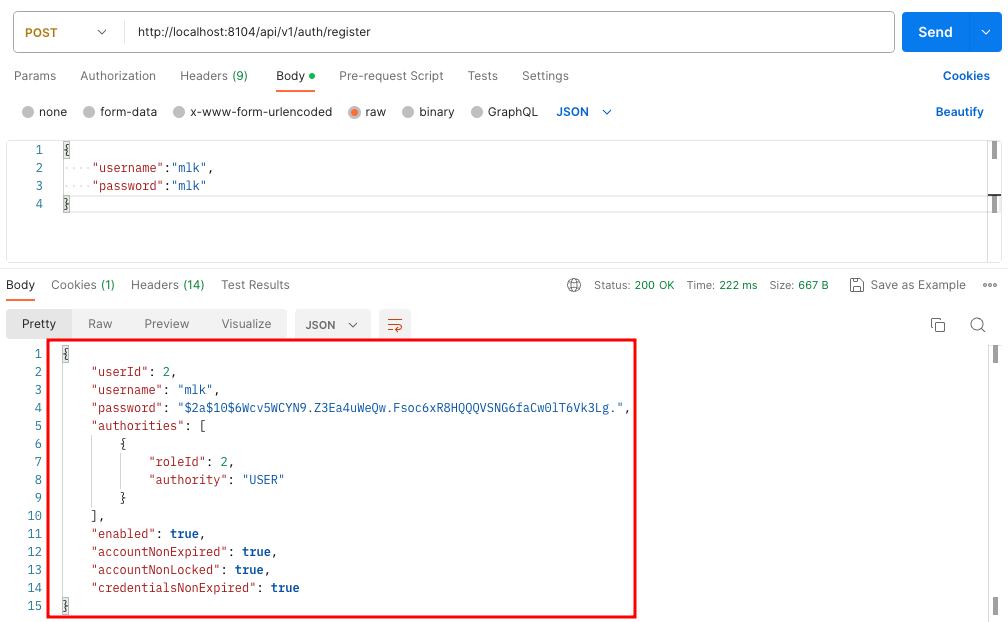
}这时候再点击用户注册接口,就可以成功注册了。
启用JWT
前面事实上是一个典型的Spring Security项目配置过程,下面重点来了,启用JWT。
首选在build.gradle中添加oauth2-resource-server引用。
plugins {
	id 'java'
	id 'org.springframework.boot' version '3.1.1'
	id 'io.spring.dependency-management' version '1.1.0'
}

group = 'com.fitit100'
version = '0.0.1-SNAPSHOT'

java {
	sourceCompatibility = '17'
}

configurations {
	compileOnly {
		extendsFrom annotationProcessor
	}
}

repositories {
	mavenCentral()
}

dependencies {
	implementation 'org.springframework.boot:spring-boot-starter-data-jpa'
	implementation 'org.springframework.boot:spring-boot-starter-web'
	implementation 'org.springframework.boot:spring-boot-starter-security'
	compileOnly 'org.projectlombok:lombok'
	developmentOnly 'org.springframework.boot:spring-boot-devtools'
	runtimeOnly 'com.h2database:h2'
	annotationProcessor 'org.projectlombok:lombok'
	testImplementation 'org.springframework.boot:spring-boot-starter-test'

	implementation 'org.springframework.boot:spring-boot-starter-oauth2-resource-server' //添加oauth2-resource-server引用
}

tasks.named('test') {
	useJUnitPlatform()
}
添加KeyGeneratorUtility.java类,用于生成key
package com.fitit100.village.util;

import java.security.KeyPair;
import java.security.KeyPairGenerator;

public class KeyGeneratorUtility {
    public static KeyPair generateRsaKey() {
        KeyPair keyPair;
        try {
            KeyPairGenerator keyPairGenerator = KeyPairGenerator.getInstance("RSA");
            keyPairGenerator.initialize(2048);
            keyPair = keyPairGenerator.generateKeyPair();
        } catch (Exception ex) {
            throw new IllegalStateException();
        }
        return keyPair;
    }
}
添加RSAKeyProperties.java类,用户获得私钥和密钥
package com.fitit100.village.util;

import lombok.Data;
import org.springframework.stereotype.Component;

import java.security.KeyPair;
import java.security.interfaces.RSAPrivateKey;
import java.security.interfaces.RSAPublicKey;

@Component
@Data
public class RSAKeyProperties {
    private RSAPublicKey publicKey;
    private RSAPrivateKey privateKey;

    public RSAKeyProperties() {
        KeyPair keyPair = KeyGeneratorUtility.generateRsaKey();
        this.publicKey = (RSAPublicKey) keyPair.getPublic();
        this.privateKey = (RSAPrivateKey) keyPair.getPrivate();
    }
}
修改SecurityConfiguration.java的代码,加入jwtEncoder,jwtDecoder等,代码如下
package com.fitit100.village.config;

import com.fitit100.village.util.RSAKeyProperties;
import com.nimbusds.jose.jwk.JWK;
import com.nimbusds.jose.jwk.JWKSet;
import com.nimbusds.jose.jwk.RSAKey;
import com.nimbusds.jose.jwk.source.ImmutableJWKSet;
import com.nimbusds.jose.jwk.source.JWKSource;
import com.nimbusds.jose.proc.SecurityContext;
import org.springframework.context.annotation.Bean;
import org.springframework.context.annotation.Configuration;
import org.springframework.security.config.annotation.method.configuration.EnableGlobalMethodSecurity;
import org.springframework.security.config.annotation.web.builders.HttpSecurity;
import org.springframework.security.config.annotation.web.configuration.EnableWebSecurity;
import org.springframework.security.config.annotation.web.configurers.oauth2.server.resource.OAuth2ResourceServerConfigurer;
import org.springframework.security.config.http.SessionCreationPolicy;
import org.springframework.security.oauth2.jwt.JwtDecoder;
import org.springframework.security.oauth2.jwt.JwtEncoder;
import org.springframework.security.oauth2.jwt.NimbusJwtDecoder;
import org.springframework.security.oauth2.jwt.NimbusJwtEncoder;
import org.springframework.security.web.SecurityFilterChain;

@Configuration
@EnableWebSecurity(debug = true)
@EnableGlobalMethodSecurity(prePostEnabled = true)
public class SecurityConfiguration {
    private final RSAKeyProperties keys;

    public SecurityConfiguration(RSAKeyProperties keys) {
        this.keys = keys;
    }

    @Bean
    public SecurityFilterChain filterChain(HttpSecurity http) throws Exception {
        http.csrf(crsf -> crsf.disable())
                .authorizeHttpRequests(auth -> {
                    auth.requestMatchers("/api/v1/auth/**").permitAll();
                    auth.anyRequest().authenticated();
                })
                .sessionManagement(session -> session.sessionCreationPolicy(SessionCreationPolicy.STATELESS));
        http.oauth2ResourceServer(OAuth2ResourceServerConfigurer::jwt);
        //http.httpBasic(Customizer.withDefaults());

        return http.build();
    }

    @Bean
    public JwtDecoder jwtDecoder() {
        return NimbusJwtDecoder.withPublicKey(keys.getPublicKey()).build();
    }

    @Bean
    public JwtEncoder jwtEncoder() {
        JWK jwk = new RSAKey.Builder(keys.getPublicKey()).privateKey(keys.getPrivateKey()).build();
        JWKSource<SecurityContext> jwks = new ImmutableJWKSet<>(new JWKSet(jwk));
        return new NimbusJwtEncoder(jwks);
    }
}
类外,我们把代码优化一下,单独出一个ApplicationConfig.java,用于配置UserDetailsService,PasswordEncoder等Bean。代码如下:
package com.fitit100.village.config;


import com.fitit100.village.repository.UserRepository;
import lombok.RequiredArgsConstructor;
import org.springframework.context.annotation.Bean;
import org.springframework.context.annotation.Configuration;
import org.springframework.security.authentication.AuthenticationManager;
import org.springframework.security.authentication.AuthenticationProvider;
import org.springframework.security.authentication.dao.DaoAuthenticationProvider;
import org.springframework.security.config.annotation.authentication.configuration.AuthenticationConfiguration;
import org.springframework.security.core.userdetails.UserDetailsService;
import org.springframework.security.core.userdetails.UsernameNotFoundException;
import org.springframework.security.crypto.bcrypt.BCryptPasswordEncoder;
import org.springframework.security.crypto.password.PasswordEncoder;

@Configuration
@RequiredArgsConstructor
public class ApplicationConfig {
    private final UserRepository userRepository;

    @Bean
    public UserDetailsService userDetailsService() {
        return username -> userRepository.findByUsername(username)
                .orElseThrow(() -> new UsernameNotFoundException("找不到该用户"));
    }

    @Bean
    public AuthenticationProvider authenticationProvider() {
        DaoAuthenticationProvider authProvider = new DaoAuthenticationProvider();
        authProvider.setUserDetailsService(userDetailsService());
        authProvider.setPasswordEncoder(passwordEncoder());
        return authProvider;
    }

    @Bean
    public AuthenticationManager authenticationManager(AuthenticationConfiguration config) throws Exception {
        return config.getAuthenticationManager();
    }

    @Bean
    public PasswordEncoder passwordEncoder() {
        return new BCryptPasswordEncoder();
    }

}
添加一个TokenService.java,用户生成JWT
package com.fitit100.village.services;

import lombok.RequiredArgsConstructor;
import org.springframework.security.core.Authentication;
import org.springframework.security.core.GrantedAuthority;
import org.springframework.security.oauth2.jwt.JwtClaimsSet;
import org.springframework.security.oauth2.jwt.JwtEncoder;
import org.springframework.security.oauth2.jwt.JwtEncoderParameters;
import org.springframework.stereotype.Service;

import java.time.Instant;
import java.util.stream.Collectors;

@Service
@RequiredArgsConstructor
public class TokenService {
    private final JwtEncoder jwtEncoder;

    public String generateJwt(Authentication auth) {
        Instant now = Instant.now();
        String scope = auth.getAuthorities().stream()
                .map(GrantedAuthority::getAuthority)
                .collect(Collectors.joining(" "));
        JwtClaimsSet claimsSet = JwtClaimsSet.builder()
                .issuer("self")
                .issuedAt(now)
                .subject(auth.getName())
                .claim("roles", scope)
                .expiresAt(Instant.ofEpochMilli(System.currentTimeMillis() + 1000 * 60 * 24))
                .build();
        return jwtEncoder.encode(JwtEncoderParameters.from(claimsSet)).getTokenValue();
    }
}
修改AuthenticationService.java,添加loginUser函数,用于用户登录认证并返回JWT。
package com.fitit100.village.services;


import com.fitit100.village.models.AppUser;
import com.fitit100.village.models.LoginResponseDTO;
import com.fitit100.village.models.Role;
import com.fitit100.village.repository.RoleRepository;
import com.fitit100.village.repository.UserRepository;
import lombok.RequiredArgsConstructor;
import org.springframework.security.authentication.AuthenticationManager;
import org.springframework.security.authentication.UsernamePasswordAuthenticationToken;
import org.springframework.security.core.Authentication;
import org.springframework.security.core.AuthenticationException;
import org.springframework.security.crypto.password.PasswordEncoder;
import org.springframework.stereotype.Service;
import org.springframework.transaction.annotation.Transactional;

import java.util.HashSet;
import java.util.Set;

@Service
@RequiredArgsConstructor
@Transactional
public class AuthenticationService {
    private final UserRepository userRepository;

    private final RoleRepository roleRepository;

    private final PasswordEncoder passwordEncoder;

    private final AuthenticationManager authenticationManager;

    private final TokenService tokenService;

    public AppUser registerUser(String username, String password) {
        String encodePassword = passwordEncoder.encode(password);
        Role userRole = roleRepository.findByAuthority("USER").get();
        Set<Role> roleSet = new HashSet<>();
        roleSet.add(userRole);

        AppUser user = new AppUser();
        user.setUserId(0);
        user.setUsername(username);
        user.setPassword(encodePassword);
        user.setAuthorities(roleSet);
        return userRepository.save(user);
    }

    public LoginResponseDTO loginUser(String username, String password) {
        try {
            Authentication auth = authenticationManager.authenticate(
                    new UsernamePasswordAuthenticationToken(username, password)
            );
            String token = tokenService.generateJwt(auth);
            return new LoginResponseDTO(userRepository.findByUsername(username).get(), token);
        } catch (AuthenticationException ex) {
            return new LoginResponseDTO(null, "");
        }
    }
}
添加LoginResponseDTO.java,用于登录后返回生成的jwt
package com.fitit100.village.models;

import lombok.Data;

@Data
public class LoginResponseDTO {
    private AppUser user;
    private String jwt;

    public LoginResponseDTO(AppUser user, String jwt) {
        this.user = user;
        this.jwt = jwt;
    }
}
然后在AuthenticationController.java中添加登录接口。
package com.fitit100.village.controller;

import com.fitit100.village.models.AppUser;
import com.fitit100.village.models.LoginResponseDTO;
import com.fitit100.village.models.RegistrationDTO;
import com.fitit100.village.services.AuthenticationService;
import org.springframework.web.bind.annotation.*;

@RestController
@RequestMapping("/api/v1/auth")
@CrossOrigin("*")
public class AuthenticationController {
    private final AuthenticationService authenticationService;

    public AuthenticationController(AuthenticationService authenticationService){
        this.authenticationService=authenticationService;
    }
    @PostMapping("/register")
    public AppUser registerUser(@RequestBody RegistrationDTO body) {
        return authenticationService.registerUser(body.getUsername(), body.getPassword());
    }

    @PostMapping("/login")
    public LoginResponseDTO loginUser(@RequestBody RegistrationDTO body) {
        return authenticationService.loginUser(body.getUsername(), body.getPassword());
    }
}
OK,现在重启项目,用postman测试登录接口

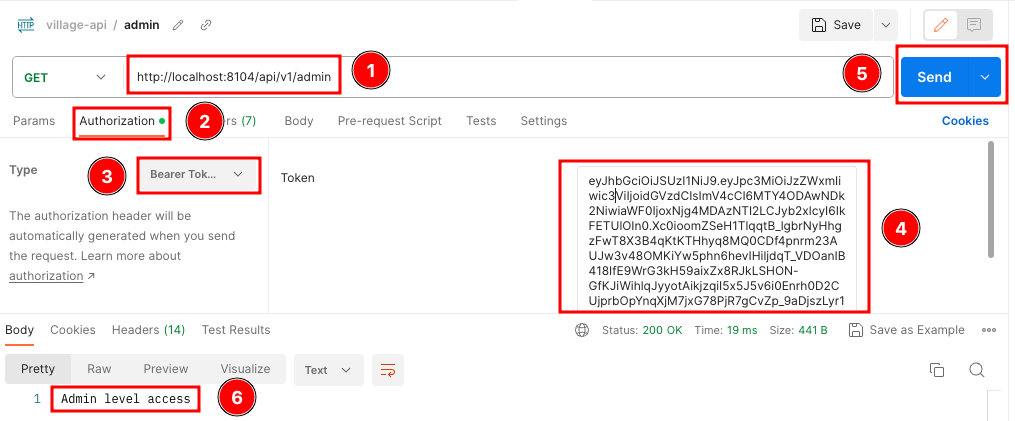
再访问接口http://localhost:8104/api/v1/admin,如果没有加入Token,将返回401错误,修改一下,把登录返回的jwt加入Header中,再点send按钮,就可以正常访问了,如下:
总结
到这里,我们的整个框架就建立起来了,后面只需要去简单的优化就可以了,例如我们注册成功后返回用户信息可以改掉,登录后也不应该返回用户信息,只需要返回jwt即可。使用jwt还有两个比较棘手的问题是刷新token和退出登录,这个我们后面有机会再去讲。本文对应的完整源代码可以在这里下载:https://github.com/kevinmeng0509/springboot_jwt_startup
评论区